Running Cellpose in QuPath#
Bryant Roberts, September 16th, 2025
These instruction were last tested on 25 August 2025. If you experience issues, I encourage you to reach out via email to bryant.roberts@adelaide.edu.au or submit an issue on image.sc forum.
Introduction#
Cellpose, and more recently Cellpose-SAM, are generalist algorithms for cell segmentation. Cellpose can operate independently of other software, or as plug-in to FIJI, Napari or QuPath thus permitting whole slide nuclear segmentation.
In this post, I will explain how to install and configure cellpose/omnipose to use independently and in QuPath software.
For a demonstration of a specific Cellpose application, the reader is referred to our case study (instructions in preparation)
Requirements#
The instructions in this documents were tested on devices with Windows 11 OS with the following GPU:
NVIDIA RTX A2000
Tools#
IMPORTANT: You may need administrative privileges on your computer. Contact your IT department for support.
In the following procedure, we will install the following:
Miniforge: conda-forge/miniforge
QuPath 0.6.0: https://qupath.github.io/
Cellpose version <= 3 and/or Cellpose version 4 (Cellpose-SAM)
Omnipose (optional)
Git (optional - only required for Omnipose) :
Instructions#
1 Install Miniforge#
We will use Miniforge to install python and open source software packages such as Cellpose.
1.1 Download Miniforge#
For Windows OS, download the Miniforge Installer via the link: conda-forge/miniforge
1.2 Install Miniforge#
Detailed instructions to set-up Miniforge on your own device are available from Mara Lampert, TU Dresden via the below link:
Getting started with Miniforge and Python
Follow the instructions to install Miniforge (stop before ‘Using Conda’ as you will create your own Conda environments for cellpose/omnipose in the instructions below).
We will then use Command Prompt to install separate conda environments for each version of Cellpose (version <= 3, and version 4 (i.e. Cellpose-SAM)), and Omnipose.
If you configured Miniforge correctly per the linked instructions (i.e., added Miniforge3 to PATH), then Command Prompt should be able to access Conda. To confirm, open Command Prompt and type the command:
conda --version
If configured correctly, Command Prompt will return the version of conda, e.g.:
conda 25.3.1
Don’t worry if you don’t get the desired result. You can use Miniforge Prompt instead. It is installed when you run the Miniforge installer.
2 Install cellpose/omnipose#
Note
If you only require one version of Cellpose and/or Omnipose, then you do not need to create all the environments as described below. Just pick the environment for the version that you need.
These are brief instructions. For an extended version of instructions refer to Section 3 below.
Procedure
Open Command Prompt from the Start menu
Choose your version of cellpose/omnipose from the tabs below.
Enter the following commands in each code block line-by-line to create a cellpose/omnipose environment. When prompted, type
yand pressenter.
Create and activate the conda environment
conda create --name cellpose3 python=3.10 -y
conda activate cellpose3
The command prompt will change from C:\...> to (cellpose3) C:\... or similar
Install cellpose and dependencies
python -m pip install cellpose[gui]==3.1.1.2
pip uninstall numpy
pip install numpy==1.26.4
Below, replace cu126 with cu118 if you have an older NVIDIA driver (<=525)
pip uninstall torch
pip3 install torch torchvision --index-url https://download.pytorch.org/whl/cu126
To open the cellpose GUI, enter the prompt:
cellpose
Close the GUI and deactivate the environment
conda deactivate
The command prompt will change from (cellpose3) C:\... back to C:\... or similar. You can now create other environments.
Create and activate the conda environment
conda create --name cellpose-SAM python=3.10 -y
conda activate cellpose-SAM
The command prompt will change from C:\...> to (cellpose-SAM) C:\... or similar
Install cellpose and dependencies
python -m pip install cellpose[gui]
Below, replace cu126 with cu118 if you have an older NVIDIA driver (<=525)
pip uninstall torch
pip3 install torch torchvision --index-url https://download.pytorch.org/whl/cu126
To open the cellpose-SAM GUI, enter the prompt:
cellpose
Close the GUI and deactivate the environment
conda deactivate
The command prompt will change from (cellpose-SAM) C:\... back to C:\... or similar. You can now create other environments.
Create and activate the conda environment
conda create -n omnipose python=3.9 -y
conda activate omnipose
The command prompt will change from C:\...> to (omnipose) C:\... or similar
Install cellpose and dependencies
pip install git+https://github.com/kevinjohncutler/omnipose.git@bf456e475be4490821f782cb785bbc943bb12abb
Below, replace cu126 with cu118 if you have an older NVIDIA driver (<=525)
pip uninstall torch torchvision
pip install torch torchvision --index-url https://download.pytorch.org/whl/cu126
pip install aicsimageio torch_optimizer scikit-image
To open the omnipose GUI, enter the prompt:
omnipose
Close the GUI and deactivate the environment
conda deactivate
The command prompt will change from (omnipose) C:\... back to C:\... or similar. You can now create other environments.
3 Install Cellpose version 3 extended instructions#
Open the dropdown for more detailed instructions to create the Cellpose3 conda environment.
Install Cellpose 3 Extended Instructions
Open Command Prompt from the Start menu
Enter the following command to create a Cellpose 3 environment
conda create --name cellpose3 python=3.10 -y
Activate the environment
conda activate cellpose3
The command prompt will change from C:\...> to (cellpose3) C:\... or similar

Fig. 6 Active cellpose3 environment#
Install cellpose (including GUI) version 3.1.1.2
python -m pip install cellpose[gui]==3.1.1.2
Downgrade to numpy v<2
pip uninstall numpy
When prompted, type y and press enter
Install numpy version 1.26.4
pip install numpy==1.26.4
(optional for GPU-support) In the following steps we will make sure that cellpose uses our GPU
pip uninstall torch
When prompted, type y and press enter
We need to download packages that are precompiled with GPU enabled. Enter the command:
pip3 install torch torchvision --index-url https://download.pytorch.org/whl/cu126
Note that this command installs pytorch and torchvision packages with CUDA 12.6 support. To work, CUDA 12.6 requires NVIDIA driver version >= 525 and < 580. If your GPU driver is older, you need to install from a different index (e.g., replace cu126 with cu118 for CUDA 11.8 that is compatible with NVIDIA driver versions >= 450 and < 525).
A CUDA Toolkit and NVIDIA driver compatibility table is available in the release notes.
To check your NVIDIA driver version, open Command Prompt and enter the command:
nvidia-smi
In the second line, the Driver Version: xxx.xx will be listed.
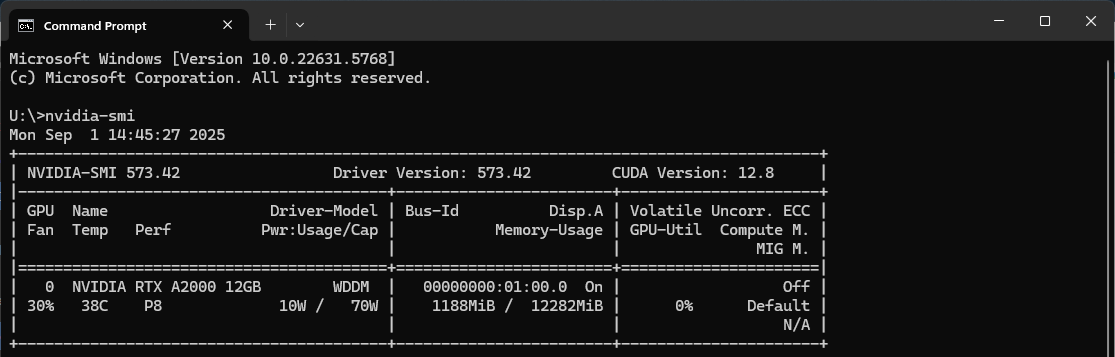
Fig. 7 NVIDIA GPU Driver Version#
To return to your
(base)environment, enter the command:
conda deactivate
The command prompt will change from (cellpose3) C:\... to C:\...> or similar.
You can now create another environment, e.g. Cellpose-SAM or Omnipose as described in Section 2.
4 Run and test Cellpose/omnipose#
4.1 Running the Cellpose 3 GUI#
Before you run the cellpose/omnipose GUI you first must activate your conda environment using the command conda activate <env_name>. Replace <env_name> with the name of your environment
Let’s use cellpose version 3 as an example.
To activate the
cellpose3environment, in the command prompt enter the command:
conda activate cellpose3
The command prompt will change from C:\...> to (cellpose3) C:\... or similar. You are now in the active cellpose3 conda environment.
Run the cellpose GUI with the prompt:
cellpose
The GUI will open as shown below. If you have configured GPU support correctly, under the Segmentation options a check mark will appear in the use GPU box
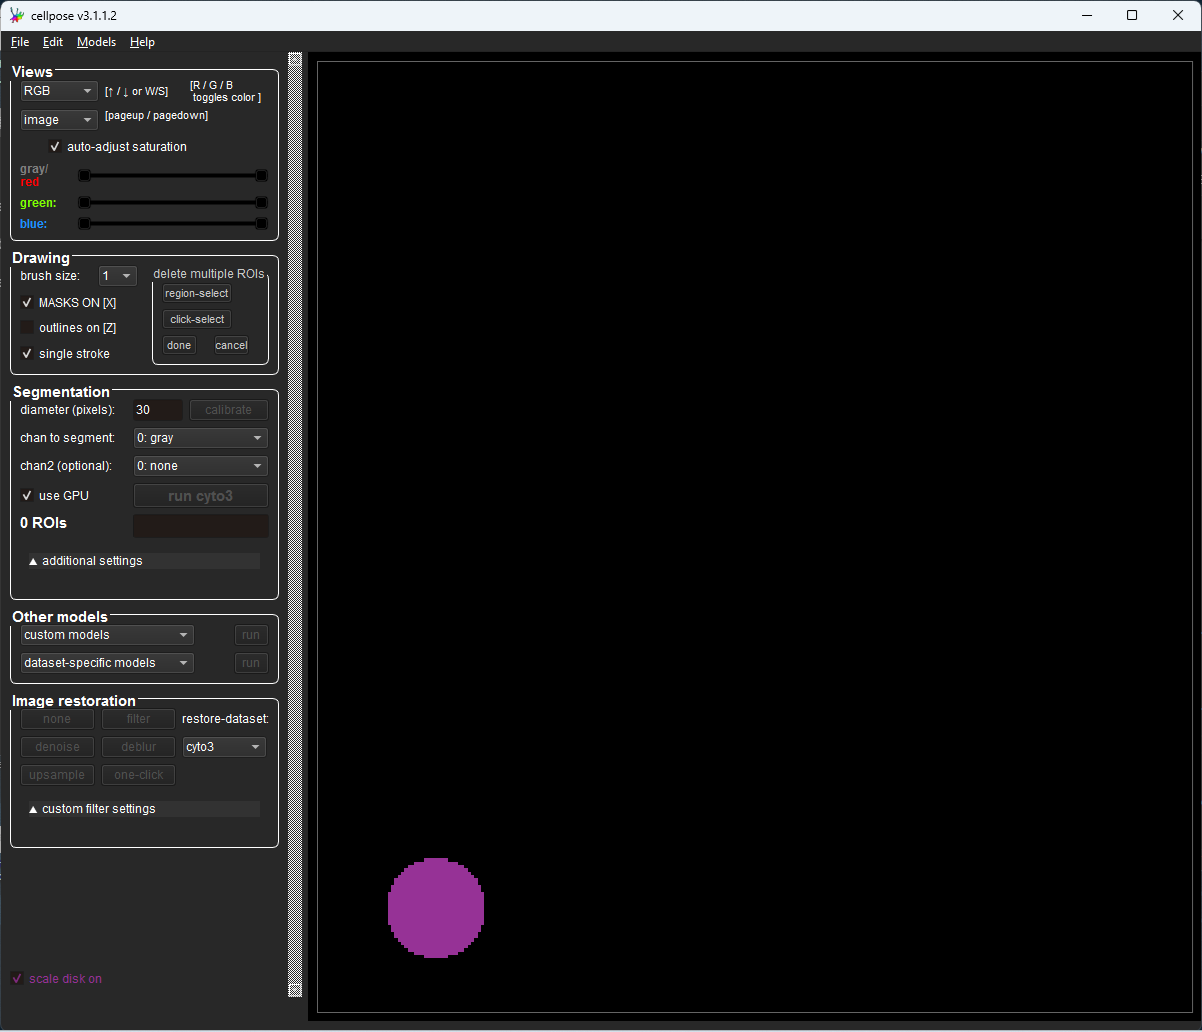
Fig. 8 Cellpose GUI with “use GPU” checked#
For the omnipose GUI, enter the command:
omnipose
Alternatively, you can run the cellpose/omnipose GUI from a Windows .bat file. This let’s you open the cellpose GUI with a double-click of an icon. For instructions see the Appendix A.
4.2 Testing cellpose 3#
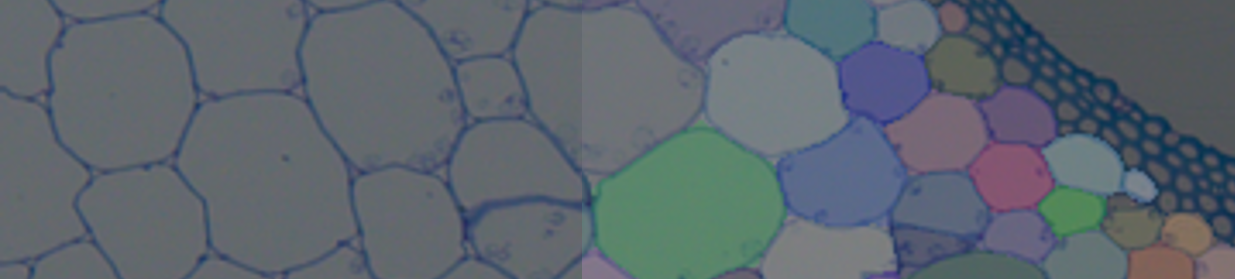
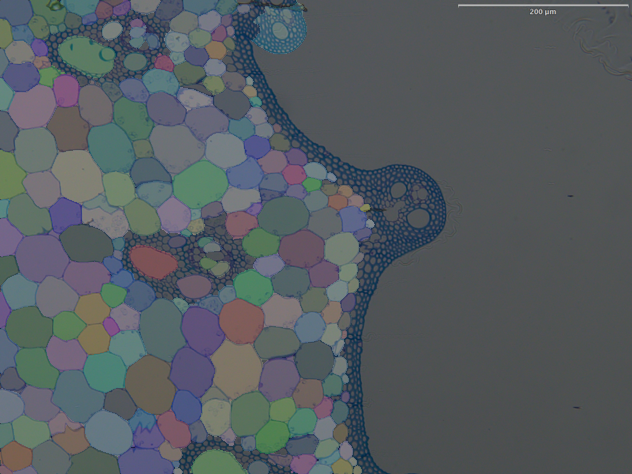
Open a fluorescent or brightfield image.
In the left panel of the GUI, click the
run cyto3button (It is underSegmentation).Cellpose will run the model and predict cells in the image using default parameters. An example output is show below.
Note that the command prompt reports the following if the GPU is working correctly:
** TORCH CUDA verson installed and working. **
>>>> using GPU (CUDA)
Congratulations! You now have a working instance of Cellpose. We can now configure Cellpose to work with QuPath.
5 Link cellpose/omnipose with QuPath#
5.1 Install QuPath v0.6.0#
Download
QuPath v0.6.0via the link: qupath/qupathRun the installer. A detailed installation guide is available via the documentation https://qupath.readthedocs.io/en/latest/docs/intro/installation.html
5.2 Configure cellpose/omnipose with QuPath#
To install the cellpose/omnipose extension, first we need to install the QuPath-BIOP catalog.
Open QuPath
Select
Extensions > Manage ExtensionsClick
Manage extension catalogsEnter the catalog URL: BIOP/qupath-biop-catalog
Click
Addand close the windowIn the
Extension Manager, browse and install the extensions you need. Click the+icon next toQuPath Cellpose extension v0.11.0
Next, configure QuPath to detect your Cellpose/Omnipose environments. First, we need the path to the python.exe file for each environment. Let’s use cellpose3 environment as an example.
Open the command prompt and activate your environment with the command:
conda activate cellpose3
To print the
python.exepath enter the command:
where python.exe
The command prompt may return many paths to different python.exe files. Look for a path in a similar form as below, ending in ...\envs\<env_name>\python.exe. For example:
C:\Users\<USERNAME>\AppData\Local\miniforge3\envs\cellpose3\python.exe
Copy the path name.
In QuPath, click
Edit > Preferencesto open the Preferences window.Click the
Cellpose/Omniposedrop-down, and text boxes will appear to enter thepython.exelocations.
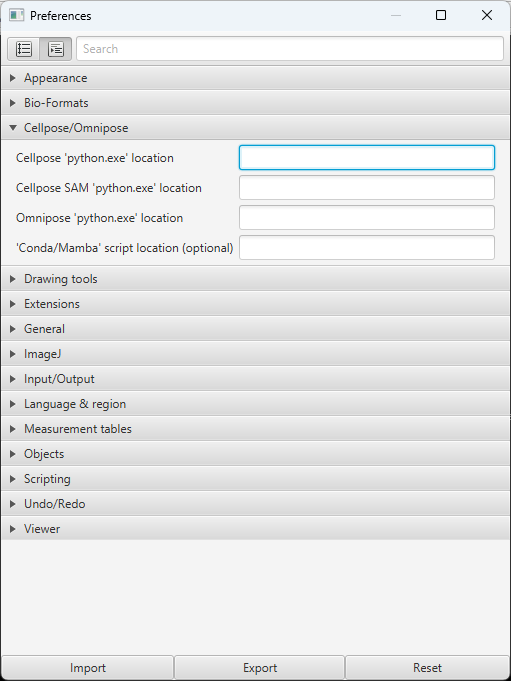
Fig. 11 Cellpose preferences in QuPath#
Enter the path for the respective
python.exefiles per the summary below:
|
|
|---|---|
Cellpose |
…\envs\cellpose3\python.exe |
Cellpose SAM |
…\envs\cellpose-SAM\python.exe |
Omnipose |
…\envs\omnipose\python.exe |
You can now run cellpose/omnipose in QuPath via the scripts available under Extensions > Cellpose. For general instructions for using the scripts, see the documentation at the link: BIOP/qupath-extension-cellpose.
Appendices#
Appendix A: Running Cellpose from .bat file#
You can create a Windows .bat file so that you can double-click to launch cellpose/omnipose. This will be helpful for colleagues that are less familiar with command line.
Here’s how:
Open Notepad
Paste the following code:
Warning
Make sure you replace the environment name as appropriate on the line CALL conda activate <ENV_NAME>. E.g., cellpose3 or omnipose, for cellpose GUI and omnipose GUI, respectively.
@echo off
REM Activate conda environment and launch Cellpose GUI

CALL conda activate <ENV_NAME>
cellpose
pause

Fig. 12 Create .bat file using notepad#
Save the file as
cellpose_gui.bator similar on your desktop (or wherever you like)Do not save as a
.txtfile.In the Save dialog, set Save as type:
All Files
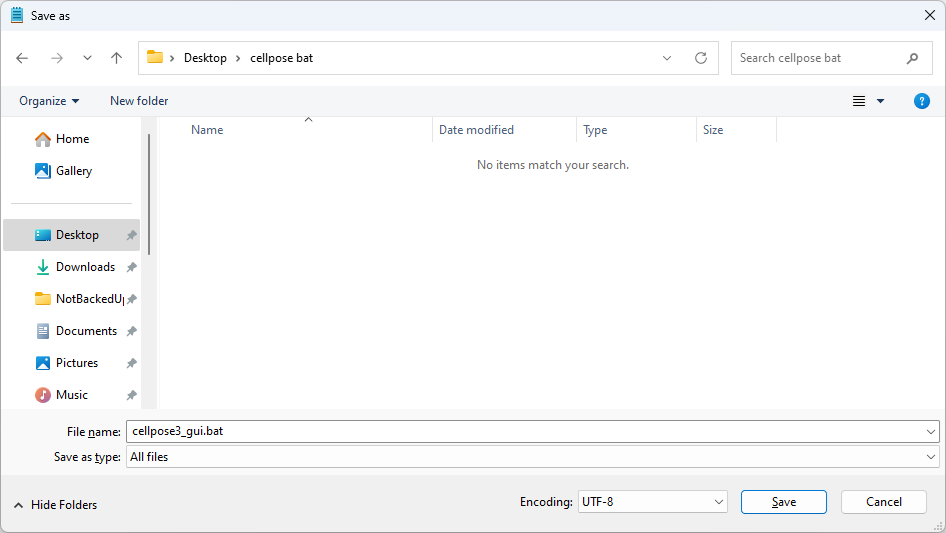
Fig. 13 Saving file as “.bat” and “All files” type#
Double-click the file icon and it will open the Cellpose/Omnipose GUI.